Creating a Shopify webhook is essential for any online business that needs real-time data syncing and seamless integration with external systems. Shopify webhooks are a powerful tool that allows your store to automatically notify external services about specific events in real-time, ensuring that your workflows are always up-to-date and efficient. Whether integrating with a CRM, syncing inventory with a warehouse, or triggering automated emails, Shopify webhooks can save you time and prevent errors by automating these processes.
In this article, we’ll explore Shopify webhooks, why they’re essential, and how you can create one for your store. By the end of this guide, you’ll have a thorough understanding of how to set up and manage Shopify webhooks to optimize your store’s operations.
What Are Shopify Webhooks?
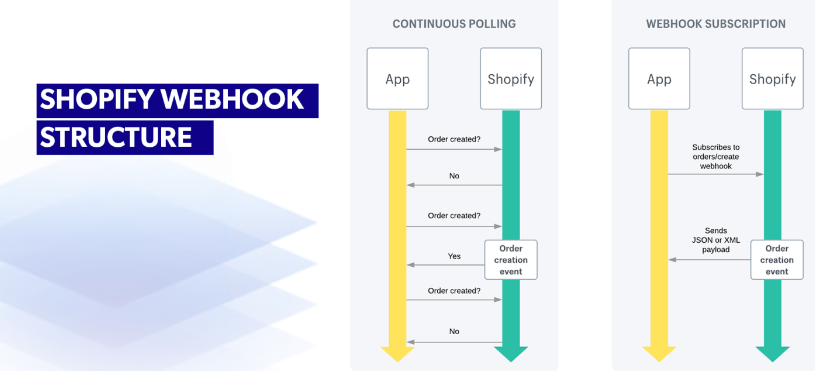
Shopify webhooks are an instrumental technology that lets a website automatically notify other systems when certain events, like creating a new order or customer, occur. This enables external systems, such as CRMs, to immediately gather the relevant data, which webhooks can also store.
Webhooks operate in the background, making your Shopify store more dynamic and responsive to changes. Unlike manual data transfers, which can be time-consuming and error-prone, webhooks automate the process, ensuring that your data is always current.
With webhooks, you’ll get push notifications as events happen, so there’s no need to check the API for updates continuously. Webhooks allow you to provide a URL where the event data, usually in JSON or XML format, is sent. To use webhooks, you must set up a URL that is publicly accessible for your application.
Why You Should Use Shopify Webhooks?
Using Shopify webhooks can significantly improve the efficiency and accuracy of your business operations. Here are some key reasons why you should consider implementing webhooks in your Shopify store:
1. Efficiency
Webhooks streamline workflows by automating the data transfer between your Shopify store and external systems. This automation eliminates the need for manual updates, reducing the potential for human error and saving time. By automatically syncing data, webhooks allow you to focus on more critical aspects of your business, such as marketing and customer service.
2. Real-Time Updates
One of the most significant advantages of using Shopify webhooks is receiving real-time updates. Whether an order is placed, a product is updated, or a customer account is created, webhooks ensure that your external systems are immediately informed of these changes. This immediacy allows you to respond quickly to new developments, improving your business’s agility and responsiveness.
3. Data Syncing
Data consistency is crucial for maintaining accurate records and providing a seamless customer experience. Shopify webhooks help ensure your data is always in sync across all platforms. Whether managing inventory, processing orders, or updating customer information, webhooks automatically send the necessary data to the relevant systems, ensuring that your records are always up-to-date.
Supported Shopify Webhook Events and Topics
You can set up Shopify webhooks to monitor a wide range of events and topics within your store. Some of the most commonly used webhook events include:
- Orders: Creation, updates, and cancellations of orders.
- Products: Creation, updates, and deletion of products.
- Customers: Creation, updates, and deletion of customer accounts.
- Inventory: Changes in inventory levels.
- Fulfillment: Fulfillment creation, updates, and cancellations.
- Themes: Changes to themes and assets.
These are just a few examples: Shopify supports many more webhook events and topics, allowing you to tailor your webhook setup to your business needs.
6 Steps to Create a Webhook in Shopify
Creating a webhook in Shopify is a vital process for automating data flows between your Shopify store and external systems. Follow these detailed steps to ensure your webhook is set up correctly and functions as intended.
Step 1: Access Webhooks
- Log in to Shopify: Start by logging into your Shopify admin panel.
- Navigate to Settings: Once logged in, locate the “Settings” option at the bottom left corner of your dashboard.
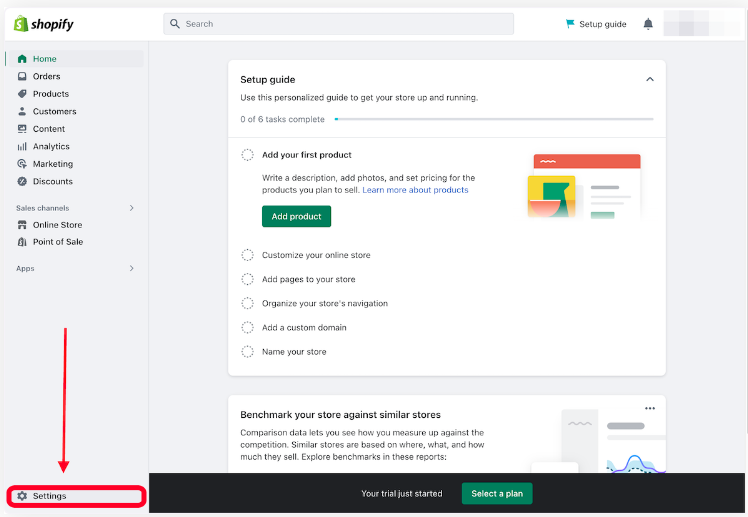
- Access Notifications: Inside the Settings menu, find and click on the “Notifications” tab. This area manages all notifications, including email alerts, SMS, and webhooks.

- Create a New Webhook: In the Notifications tab, scroll down until you find the “Webhooks” section, then click on the “Create webhook” button. This action opens a dialog box where you can configure your webhook’s settings.
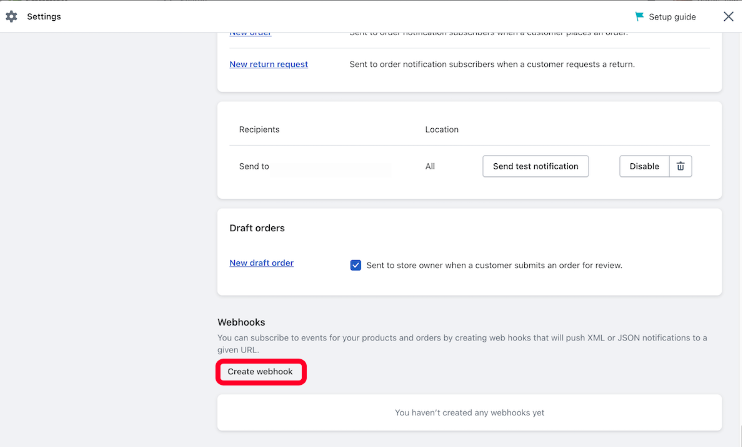
This initial setup is crucial as it establishes the foundation for the webhook’s functionality. Ensuring correct settings at this stage guarantees seamless data flow between Shopify and external systems.
Step 2: Identify a Target Event
- Choose the Trigger Event: The next step involves selecting the event that will trigger the webhook. Shopify provides a range of events, such as order creation, product updates, or customer account changes.
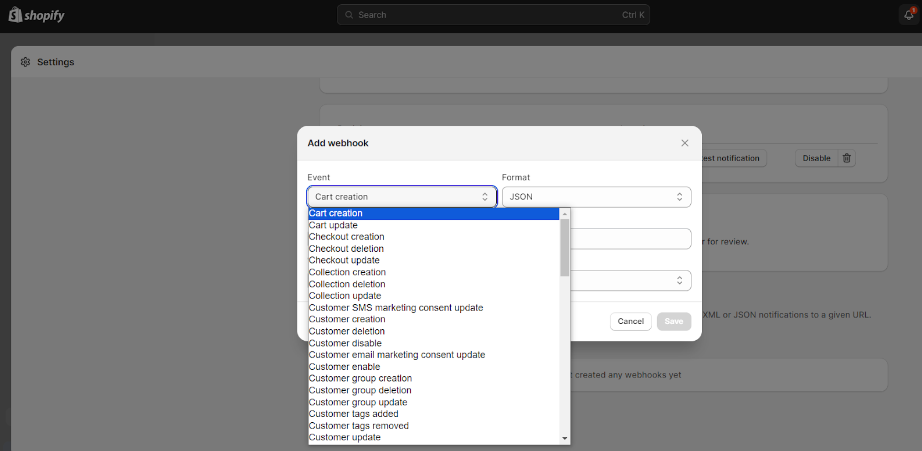
- Consider Business Needs: When choosing the event, reflect on your specific business needs. For instance, if inventory management is critical, you might select an event that triggers when inventory levels change.
- Evaluate Data Volume: Consider how frequently the event occurs and the volume of data it generates. Frequent events like order placements require that your external system can handle the data influx efficiently.
- Select Appropriate Event: Make an informed choice based on the systems you’re integrating with and your business’s specific data synchronization needs.
Identifying the right target event is essential as it determines what data will be sent to the external system, ensuring that the integration effectively supports your business operations.
Step 3: Choose Between JSON and XML as the Format
- Select Data Format: Shopify allows you to choose between JSON and XML for the data format.
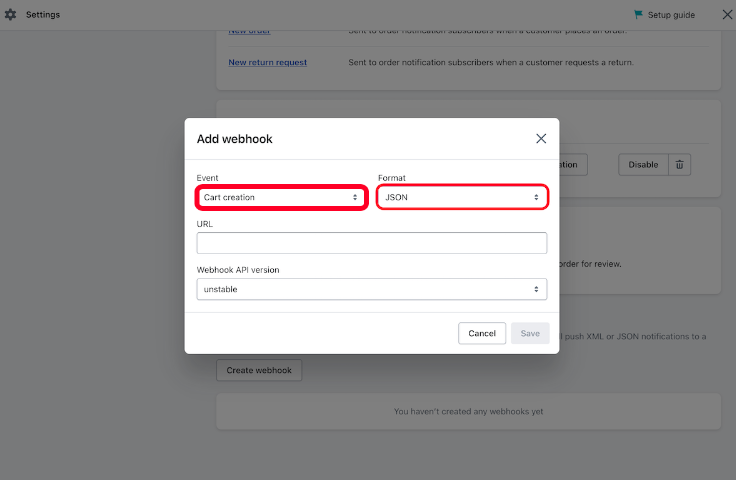
- Consider JSON: JSON is the more popular choice due to its lightweight nature and ease of use. It’s widely supported in modern web applications and APIs.
- Evaluate XML: XML is more verbose but may be necessary for legacy systems or applications that require structured data. It’s flexible and can support complex data structures.
- Consult Documentation: If uncertain, consult with your development team or refer to the external system’s documentation to determine which format best suits your integration.
Choosing the appropriate data format is critical, impacting how easily the receiving system can process it.
Step 4: Choose the URL
- Specify the Endpoint: Enter the URL of the external system to which the webhook data will be sent. This URL will act as the endpoint that receives the data from Shopify.
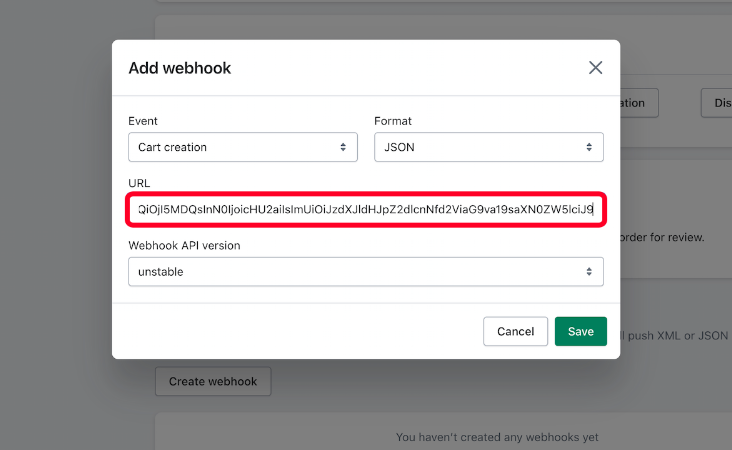
- Ensure Proper Configuration: Ensure the URL is correctly configured to accept incoming HTTP POST requests from Shopify. This involves setting up server-side scripts or APIs to handle the data.
- Use HTTPS: The URL should use HTTPS to encrypt the transmitted data, ensuring security and protecting it from potential interception or tampering.
- Consult a Developer: If you need to become more familiar with setting up webhooks, consider consulting a developer to help configure the receiving system and ensure it’s ready to process the data.
Setting the correct URL is crucial for the data transfer process, ensuring the webhook can communicate successfully with the external system.
Step 5: Select Add Webhook
- Review Settings: Before finalizing, double-check all your settings, including the event type, data format, and URL, to ensure accuracy.
- Add the Webhook: Once verified, click “Save” to finalize the setup. This action activates the webhook, making it live and ready to trigger whenever the specified event occurs.
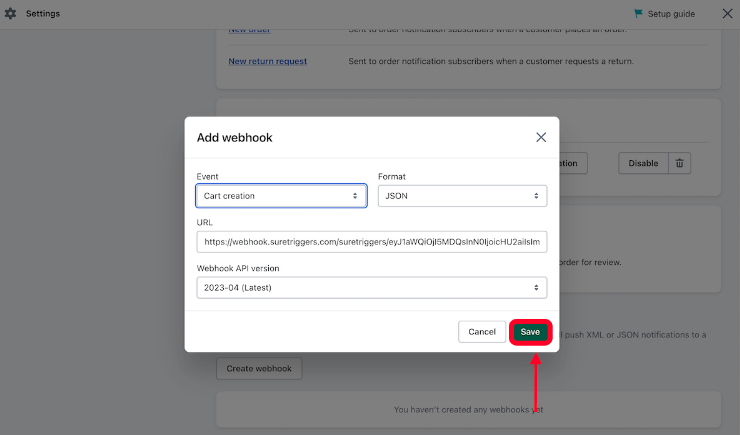
- Monitor for Errors: Any mistakes in this setup phase can result in data transmission failures or improper processing by the external system.
This step officially makes your webhook operational, linking Shopify with your external systems for real-time data synchronization.
Step 6: Test and Confirm
- Testing is Optional but Recommended: While optional, testing your webhook is highly advisable to ensure everything works correctly.
- Send a Test Notification: Look for the “Send test notification” option in the webhook settings. This sends a sample payload to the specified URL, mimicking the chosen event.
- Verify Reception and Processing: Examine the external system’s response to confirm that the webhook data is being received and processed as expected.
- Troubleshoot Issues: If the test reveals problems—such as the external system not processing the data correctly—you may need to adjust the URL endpoint or review the data format.
- Final Confirmation: Testing helps identify and resolve issues before the webhook goes live, preventing potential disruptions in your business operations.
Testing ensures your webhook is ready for real-world scenarios, allowing you to catch and fix any issues before they affect your business processes.
By carefully following these six steps, you can create a Shopify webhook that efficiently automates data transfer, keeping your business operations smooth and synchronized.
Best Practices for Shopify Webhooks
You may get the most out of your Shopify webhooks, it’s important to follow some best practices:
-
Recover Webhooks
Webhooks can occasionally fail due to network issues or misconfigurations. It’s essential to implement a retry mechanism that automatically attempts to resend failed webhooks. Shopify retries webhooks up to 19 times over 48 hours. You can avoid missing critical updates by ensuring that your system is designed to handle retries.
-
Duplicate Webhooks
To prevent duplicate data processing, ensure your external systems are set up to handle idempotency. Idempotency means that even if the same webhook is received multiple times, the system will process it only once. This practice helps avoid issues such as duplicate orders or redundant updates.
-
Utilize Filter Parameters That Are Supported
Shopify allows you to filter webhook events using query parameters, ensuring that only relevant data is sent to your external systems. By filtering webhooks, you can reduce the amount of data being transmitted, improving efficiency and reducing the load on your systems.
How to Delete Shopify Webhooks?
Deleting a Shopify webhook is simple, but it’s important to remove the correct webhook to avoid disrupting critical data flows between your Shopify store and external systems.
To delete a webhook, follow these steps:
- Access Webhooks: Log in to your Shopify admin panel and navigate to the “Settings” section. From there, go to the “Notifications” tab, where you manage all your store’s notifications, including webhooks.
- Locate the Webhook: Scroll down to the “Webhooks” section. Here, you will see a list of your store’s active webhooks. Identify the webhook you wish to delete.
- Delete the Webhook: Click on “Delete” button next to the specific webhook. Shopify will prompt you to confirm the deletion to prevent accidental removal. Once confirmed, you can remove the webhook from your store’s settings.
- Review Your Webhooks: After deletion, it’s a good practice to review your remaining webhooks to ensure that all necessary integrations are still in place and functioning correctly.
Deleting unnecessary or outdated webhooks helps keep your Shopify store’s data management clean and efficient, reducing the risk of errors or conflicts with external systems.
FAQs of Shopify Webhook
1. How to Subscribe to a Shopify Webhook?
Subscribing to a Shopify webhook is done through the Shopify admin panel by following the steps outlined earlier in this article. After setting up the webhook, Shopify will automatically send notifications to the specified URL whenever the chosen event occurs.
2. How to Test Shopify Webhook?
You can test your Shopify webhook by sending a test notification from the Shopify admin panel. This test ensures that your webhook is correctly configured and that the receiving system processes the data as expected.
3. How Do I Authenticate Shopify Webhooks?
You can use the HMAC (Hash-based Message Authentication Code) header sent with each webhook to authenticate Shopify webhooks. This header contains a cryptographic hash of the webhook data, which can be verified using your Shopify secret key to ensure the webhook is legitimate.
4. Does My Shopify Store Have an API Key?
Yes, your Shopify store has an API key, which is required for specific integrations and applications. You can find your API key in the Shopify admin under Apps > Manage private apps. Keeping your API key secure is important, as it grants access to your store’s data.
Final Words,
Creating a Shopify webhook is a powerful way to automate your store’s operations, ensuring that your data is always current and synchronized across all platforms. Following the steps outlined in this article, you can easily set up and manage webhooks that enhance your store’s efficiency and responsiveness.
Whether you’re looking to integrate with external systems, streamline your workflows, or improve data accuracy, Shopify webhooks are an essential tool in your eCommerce arsenal. With proper setup and adherence to best practices, you can unlock the full potential of Shopify webhooks to optimize your business operations.

