Setting up your WooCommerce store is an exciting step toward launching your online business, but ensuring everything works seamlessly before going live is crucial. This is where WooCommerce test mode comes into play. It allows you to simulate real transactions, test various scenarios, and iron out any potential issues without the risk of losing money or damaging your brand’s reputation.
This article will walk you through the steps to set up WooCommerce test mode, making sure your store is prepared for a successful launch.
What is WooCommerce Test Mode?
WooCommerce test mode is a feature that provides a safe environment to test your online store’s functionality. This mode allows you to simulate different types of transactions, including successful payments, failed payments, refunds, and more. The primary purpose of WooCommerce test mode is to allow store owners to test their store’s checkout process, payment gateways, and overall functionality without processing actual transactions. This is particularly important for new stores or when implementing significant updates, as it helps prevent errors that could negatively impact your customers and your business.
When WooCommerce Test Mode is enabled, any transaction conducted on your store is purely hypothetical. This means that while you can see how everything works, no real money is exchanged, and no products or services are delivered. This testing environment is essential for ensuring your payment processes are error-free and ready for the real world.
Benefits of Test Mode in WooCommerce
Risk-Free Testing
A key advantage of WooCommerce test mode is the opportunity to perform risk-free testing. In test mode, all transactions are simulated, so no real money is involved. This allows you to experiment with different scenarios, such as testing how your store handles various payment methods, without any financial consequences. For instance, you can test credit card payments, refunds, and even payment failures to see how your store responds.
Streamlined Workflow
Another advantage of using WooCommerce test mode is the streamlined workflow it offers. Testing your store’s functionality can be a time-consuming process, especially if you’re concerned about making mistakes that could affect live customers. By enabling test mode, you can quickly and easily make changes, run tests, and identify potential issues without disrupting your workflow. This makes the development and testing process more efficient, allowing you to focus on fine-tuning your store rather than worrying about potential errors.
Building Trust
Trust is a critical factor in eCommerce, and WooCommerce test mode helps you build that trust with your customers. By thoroughly testing your store before it goes live, you can ensure that the checkout process is smooth, secure, and error-free. This reduces the likelihood of customers encountering issues during checkout, which can lead to abandoned carts and lost sales. A well-tested store instills confidence in your customers, encouraging them to complete their purchases and return for future transactions.
Legal Safeguard
WooCommerce test mode also serves as a legal safeguard. When testing live transactions, there is always the risk of accidentally processing a real payment, which can lead to complications with refunds, chargebacks, and customer disputes. Test mode eliminates this risk by ensuring that all transactions are simulated, protecting you from potential legal issues that could arise from processing unintended payments. This is especially important for businesses operating in highly regulated industries where compliance with payment processing laws is critical.
How to Setup Test Mode in WooCommerce?
Enabling test mode in WooCommerce is simple, but paying close attention to the details is important to ensure proper setup. In this section, we will guide you through enabling test mode using the Payment Plugin for Stripe WooCommerce, one of the most popular and widely used payment gateways for WooCommerce stores.
Step 1: Install Payment Plugin for Stripe WooCommerce
The first step in enabling WooCommerce test mode is to install the Payment Plugin for Stripe WooCommerce. This plugin allows you to integrate Stripe, one of the most trusted payment gateways, with your WooCommerce store. Stripe is recognized for its strong security features and user-friendly design, making it a great option for online store owners.
To install the Payment Plugin for Stripe WooCommerce, follow these steps:
- Log in to your WordPress admin dashboard.
- Navigate to “Plugins”, then clịck “Add New.”
- In the search bar, type “Payment Plugin for Stripe WooCommerce.”
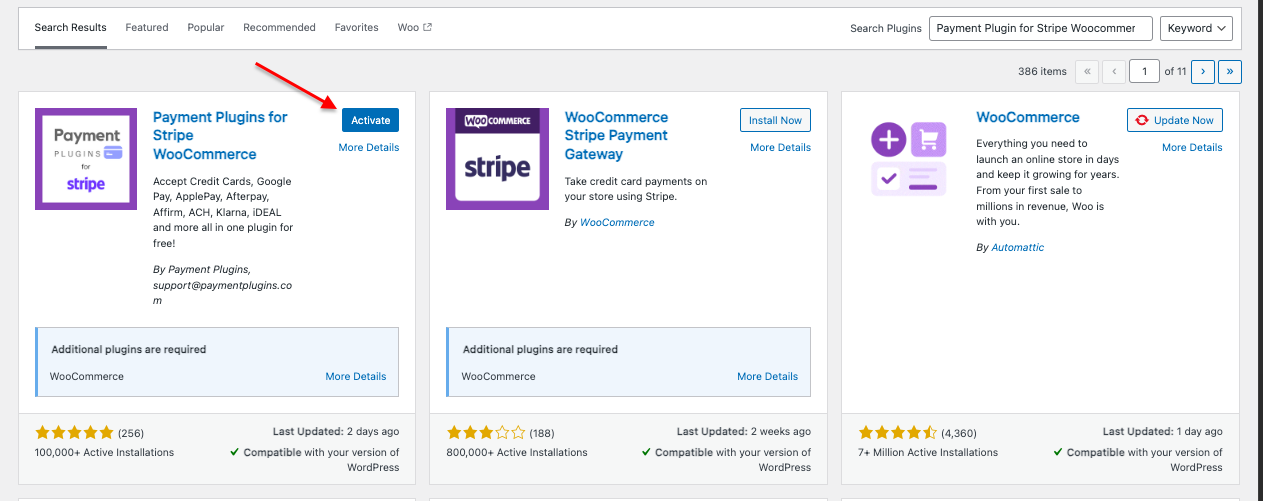
- Click “Install Now” next to the plugin, and then click “Activate” once the installation is complete.
Step 2: Activate Test Mode in Stripe
After installing the Payment Plugin for Stripe, the next step is to activate test mode in Stripe. This will allow you to simulate transactions using Stripe’s test environment. To activate test mode in Stripe:
- Log in to your Stripe account.
- Navigate to the “Developers” section from the left-hand menu.
- Click on “API keys.”
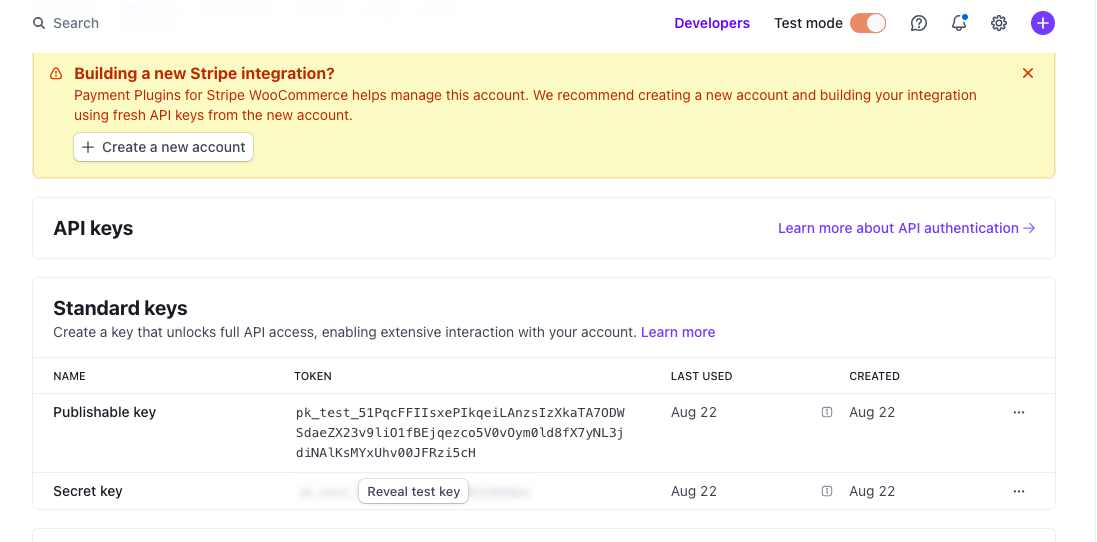
- Toggle the “Reveal test key”
- Copy the test API keys (Publishable key and Secret key) provided by Stripe.
Step 3: Enable Test Mode in WooCommerce
With Stripe’s test mode activated, you can now enable test mode in WooCommerce. This step involves configuring WooCommerce to use the test API keys provided by Stripe.
- In your WordPress admin dashboard, go to “WooCommerce”, then select “Settings.”
- Click on the “Payments” tab.
- Under “Stripe,” click on “Manage.”
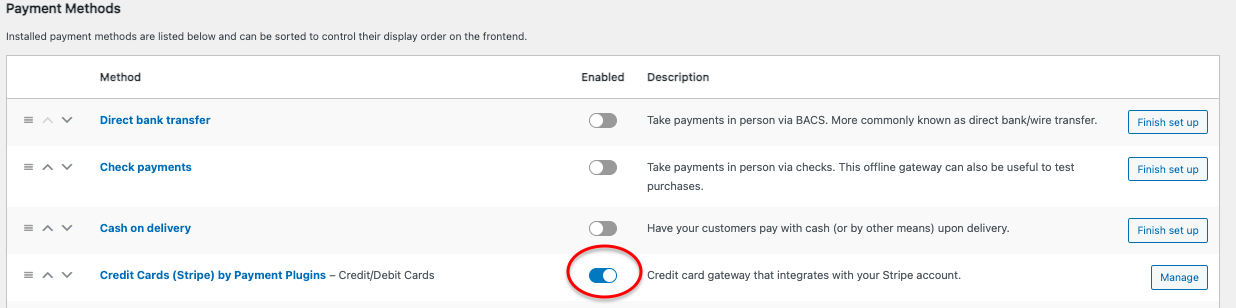
- Paste the test API keys you copied from your Stripe account into the corresponding fields.

Save the changes.
Step 4: Make a Test Order
With WooCommerce test mode enabled, it’s time to make a test order to ensure that everything is working correctly. This step is crucial for verifying that your store’s checkout process, payment gateway, and order management system are functioning as expected.
To make a test order, follow these steps:
- Visit your WooCommerce store as if you were a customer.
- Browse your products and add one or more items to your cart.
- Proceed to checkout and enter the required customer information.
- When prompted to enter payment details, use one of Stripe’s test card numbers. For example, you can use “4242 4242 4242 4242” for a Visa card.
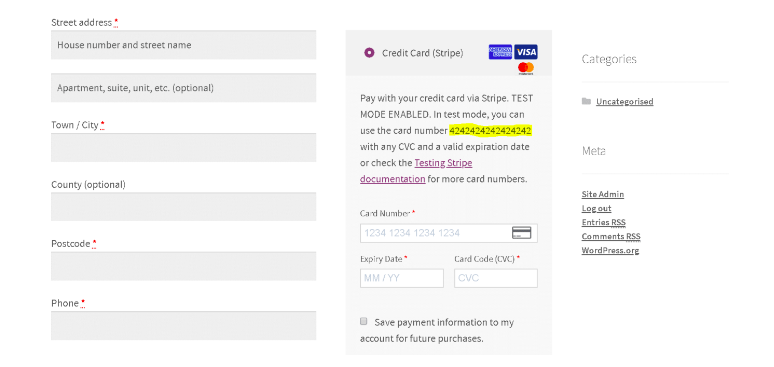
- Complete the transaction and review the order confirmation page.
After placing the test order, log in to your WordPress admin dashboard and navigate to WooCommerce > Orders to verify that the order was processed successfully. Check that the order status is updated correctly and that no real money was transferred during the transaction.
By following these steps, we can confidently test our checkout processes, ensuring that when we transition to live transactions, our customers will experience a smooth and secure checkout.
Other WooCommerce Test Modes
WooCommerce test mode isn’t limited to testing regular transactions. You can also test other aspects of your store, such as test mode, which also allows you to test payments using PayPal, refunds, and manual captures to ensure that these processes work seamlessly.
Test payments with the PayPal Sandbox
WooCommerce offers the ability to test payments with the PayPal Sandbox, a powerful tool that simulates the PayPal payment process without transferring real money.
Here’s how to set up and use the PayPal Sandbox in WooCommerce:
Step 1: Create a PayPal Developer Account
Before you can use the PayPal Sandbox, you need to create a PayPal Developer account. This account will give you access to the PayPal Developer dashboard, where you can create and manage sandbox accounts.
- Visit the PayPal Developer website and sign in with your existing PayPal account. If you don’t have a PayPal account, you’ll need to create one first.
- Once logged in, navigate to the PayPal dashboard and click on “Sandbox” in the top menu.
- In the Sandbox menu, select “Accounts” and click on “Create Account” to generate test buyer and seller accounts.
Step 2: Configure Sandbox Accounts
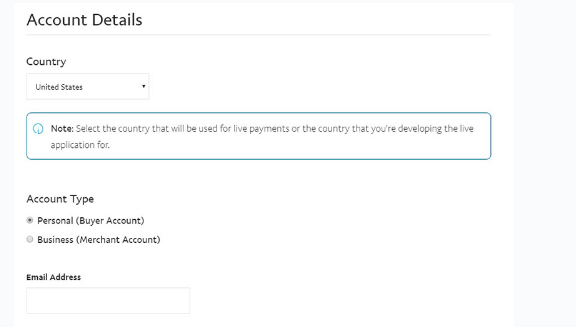
You’ll need at least two sandbox accounts: one for the buyer and one for the seller. The buyer account simulates a customer making a purchase, while the seller account represents your business account receiving the payment.
- For the buyer account, select “Personal” as the account type. This simulates a regular PayPal account that your customers might use.
- For the seller account, select “Business.” This will simulate your PayPal business account that receives payments from customers.
- Once the accounts are created, you’ll receive sandbox login credentials for both. These will be used to test transactions within your WooCommerce store.
Step 3: Set Up PayPal Sandbox in WooCommerce
Now that you have your sandbox accounts ready, you need to configure WooCommerce to use the PayPal Sandbox.
- Log in to your WordPress admin dashboard, go to “WooCommerce”, and then select “Settings.”
- Click on the “Payments” tab, then select “PayPal” to manage the PayPal payment gateway settings.
- In the PayPal settings, check the box labeled “Enable PayPal Sandbox” to activate the sandbox mode.
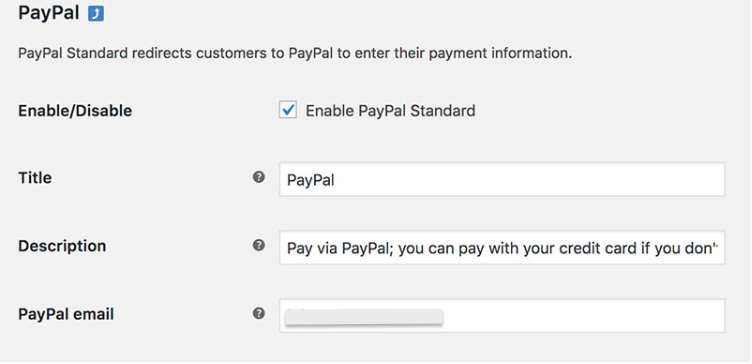
- Enter the sandbox API credentials (Client ID and Secret) associated with your PayPal sandbox business account. You can find these credentials in the PayPal Developer dashboard under the “REST API apps” section.
- Save the changes.
Step 4: Perform Test Transactions
With the PayPal Sandbox enabled, you can now perform test transactions on your WooCommerce store.
- Visit your store as a customer, add products to your cart, and proceed to checkout.
- Select PayPal as the payment method.
- When redirected to PayPal, log in using the sandbox buyer account credentials.
- Complete the purchase and check that the transaction is processed correctly in WooCommerce and PayPal.
- After completing the test transaction, you can log into your sandbox seller account to verify that the payment was received and processed correctly.
Testing with the PayPal Sandbox is an essential step in preparing your WooCommerce store for launch.
Testing Refunds
Testing refunds in WooCommerce test mode is crucial for ensuring that your refund process is smooth and efficient. To test a refund:
- Go to “WooCommerce”, then select “Orders” in your WordPress dashboard.
- Select the order you wish to refund.
- Click on “Refund” and choose the amount to refund.
- Complete the refund process and check that it’s correctly reflected in your store’s records.
Testing Manual Captures
Manual captures involve authorizing a payment during order placement but capturing the funds later. This is often used in scenarios where stock availability needs to be confirmed before charging the customer. To test manual captures:
- Ensure that manual capture is enabled in your Stripe settings.
- Place a test order using the steps outlined earlier.
- Instead of capturing the payment immediately, navigate to “WooCommerce”, click on “Orders.”
- Select the order and click “Capture” to manually capture the funds.
FAQs of WooCommerce Test Mode
1. How do I run WooCommerce in test mode?
Running WooCommerce in test mode involves enabling test mode in your payment gateway and configuring WooCommerce to use test API keys. This process allows you to simulate transactions and ensure everything functions correctly before going live.
2. How to test WooCommerce website?
Testing your WooCommerce website involves more than just enabling test mode. You should test various aspects of your store, including product pages, the checkout process, payment gateways, shipping options, and refund processes. Using test mode, you can simulate different scenarios and identify any issues that need to be addressed.
3. Does WordPress have a sandbox mode?
WordPress has no built-in sandbox mode, but you can create a staging environment using plugins or your hosting provider’s tools. A staging environment duplicates your live site, allowing you to test changes without impacting your live store.
4. How do I turn on sandbox mode?
Turning on sandbox mode typically involves configuring your payment gateway to use a test environment. For example, you can enable sandbox mode in Stripe by toggling the “Reveal test key” switch and using the provided test API keys in your WooCommerce settings.
Conclusion
Setting up WooCommerce test mode is an essential step in ensuring that your online store is fully functional before it goes live. By enabling test mode, you can simulate transactions, test various scenarios, and identify potential issues without financial risk.
Whether you’re testing regular transactions, refunds, or manual captures, WooCommerce test mode provides a safe and efficient way to prepare your store for success. By following the steps outlined in this article, you’ll be well on your way to launching a smooth and secure WooCommerce store, ready to meet the needs of your customers with confidence.